The key difference between a welder and a grinder is the amount of setup that welders do. It doesn’t take too many hours cleaning out unsatisfactory welds with a disc grinder before even neophyte welders understand that it is a good idea to make sure their welding equipment is in proper working order before they get started.
When it comes to inspecting orbital welding machines, however, even experienced welders may be intimidated. At first glance, the level of automation involved in orbital welding would seem to make an inspection more complicated. In practice, however, an orbital welding machine daily inspection checklist looks a lot like any other welding safety checklist. We’ll take a detailed look at what parts of your orbital welding setup you should inspect and why, and provide a handy downloadable checklist to post in your workspace.

Click here to download our 5-minute daily inspection checklist
A Welding Inspection Begins With the Worksite
The first step to making sure an orbital arc welding machine is ready to start the job is to inspect the area surrounding your equipment. The worksite must be safe for work before you begin welding. This is the first step not only to creating a reliable weld, but also preventing injury to you or others and damage to equipment or facilities. Before welding, the work area and personal protective equipment (PPE) should be inspected.
Worksite Conditions:
- General Cleanliness: The work area should be clear of clutter, dust, metal shavings, and other common workplace debris. Dust and other airborne particulate matter can contaminate welds and workplace clutter can interfere with operator movement while welding is in progress.
- Airflow: Gas tungsten arc welding uses a shielding gas to protect the weld from the atmosphere while the metal is molten. Prior to welding with an orbital arc welder, the operator should check the area to ensure that there is no air movement that might blow away the shielding gas and cause the weld to become contaminated. The operator may need to erect barriers to ensure the weld remains shielded.
- Ventilation: Welding can produce fumes that in high enough quantities in a given volume may be hazardous. Before beginning the weld, the operator should make sure they have enough space and ventilation to prevent fumes from building up to unsafe levels.
- Flammable or Combustible Materials: The operator should check the work area to make sure that no materials like fabrics or insulation are close enough to be ignited by the welding process. They should also be sure that no combustible fluids or gasses could be exposed to the arc, sparks, or hot workpieces during or after welding.
- Water or Other Fluids: Arc welding machines use an exposed electrical arc that can pose a shock hazard in a wet environment. Any spills or standing water should be mopped up or allowed to dry before welding begins.
Before starting a weld, the operator should inspect themselves along with their equipment. Welders should check to ensure they have the proper personal protective equipment (PPE) before they begin:
Personal Protective Equipment:
- Appropriate Clothing: Welding arcs produce bright light that can burn the skin. Welders should wear long sleeves and pants and avoid synthetic fibers that can melt and stick to skin. Clothing should be made of cotton or a special heat-resistant blend.
- Protective Clothing: Welders operating manual arc welding machines have traditionally worn specialized leather sleeves, jackets, and aprons to protect themselves from arc flash and burns from molten metals and sparks. These may not be necessary when using an automated arc welding machine, but could be needed if other welding operations are going on nearby.
- Appropriate Footwear: Cap toe, non-slip, enclosed footwear is standard in the workplace to prevent crushing injuries, lacerations, and burns to the foot.
- Gloves: Temperatures hot enough to inflict third-degree burns are still a hazard when handling the workpiece, weld head, or tungsten electrode of an orbital arc welding machine. They should be available at the worksite and worn when appropriate.
- Light Shielding: Before operating an orbital arc welding machine, the operator should ensure their eyes and the eyes of those around them are properly protected from the arc’s light. Welding helmets are standard, but some automated orbital welders have cameras in the weld head that allow the operator to observe the welding process remotely. In this case, the welding area should be shielded behind light-blocking barriers.
- Eye Protection: Eye protection in the form of safety goggles or glasses should be worn at all times as a standard precaution even if there is no obvious immediate need, since other workers on the site may be performing work that can injure the eye.
- Fire Extinguisher: The high heats and voltages involved in welding mean that fires are a constant risk. A fire extinguisher that is rated for electrical, chemical, and combustible fires should be part of standard welding PPE.
All of the above safety precautions are typical safety concerns that should be part of any arc welding machine daily inspection checklist, whether orbital or manual. Next, we’ll discuss how to inspect your orbital welding equipment in order to spot any issues before they start.
Orbital Arc Welding Machine Daily Inspection Checklist
An orbital arc welding machine inspection uses basic skills that are familiar to most experienced welders. If you’ve worked with TIG machines before, any issues with the electrode and gas cup on an orbital weld head will be visually apparent. More complicated orbital welding weld heads use a wire feed, and the principles on which this works will be familiar to those who’ve worked with MIG wire feeds. A five-minute inspection of the main working components of an orbital arc welding setup can be divided into three major parts: an overall system check, a weld head check, and a power supply check.
Overall System Check:
- Manuals and Weld Schedules: Before starting, ensure that the manuals for the weld head and the power supply are available along with the weld schedules for the joints that will be connected.
- Cable Connections: The power connections between your power source, power supply, and the weld head should be inspected for any visible damage. All connections should be tight and firm. Control connections between interfaces, like laptops and pendants, should also be checked to ensure a firm connection.
- Ground Connection: Ensure that the system ground has a firm connection to the workpiece without air gaps or object interference. There should be no paint or other substances at the connection points that could impede current flow.
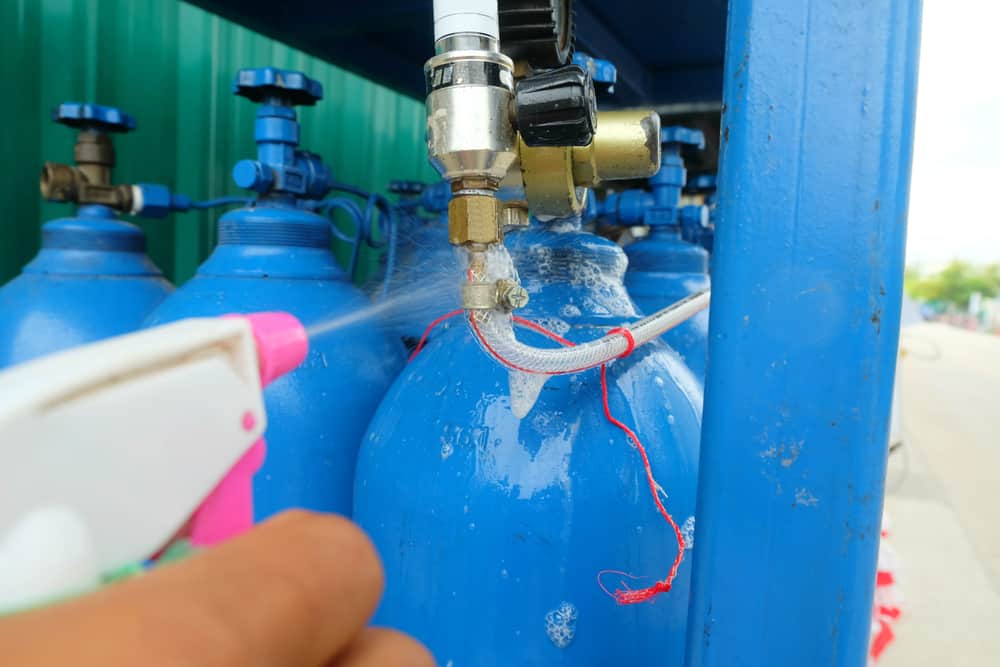
- Gas Supply: Ensure that the correct gas is being used for the type of welding being done. Operators should make sure the gas used is the same as that specified on the welding production schedule (WPS). Visually inspect the gas lines to ensure a tight connection. Once the gas valve is opened, use a specialized leak detection spray to check for leaks.
- Line Purge: Once it has been verified that the gas connection is sealed, then the lines should be purged to remove any oxygen or moisture that has intruded. A good rule of thumb is that for every foot of gas line, the line should be purged for ten to 15 seconds. A nine-foot gas line should be purged for at least a minute and a half.
- Gas Flow: With the gas supply turned on and the gas lines purged, the regulator should be checked to ensure that gas pressure does not exceed 50 PSI. Consult the orbital arc welding manual to ensure gas flow is within prescribed parameters for the weld head and torch setup, and matches the specifications set out in the WPS.
- Cooling System: Some orbital arc welding machines are compatible with or require liquid cooling units. Check coolant levels and visually inspect coolant lines to ensure there are no leaks before starting. If a coolant flow or circulation indicator is present ensure that it is moving and coolant is flowing before starting.
Weld Head Check:
- Moisture Removal: Special measures should be taken to keep atmospheric humidity from condensing on or being absorbed by diffusers and enclosed orbital weld heads. They may be heated to 80°C (176° F) to ensure that moisture levels are reduced to the point that they will not interfere with welding. This can be easily accomplished by performing a test weld on a dummy piece of material.
- Gas/Gas Lens Cup: Check the weld head to ensure that the correct type and diameter of gas cup or gas lens cup is installed in the weld head. Take the time to visually inspect the gas cup for signs of damage or wear from repeated heating.
- Tungsten: The tungsten electrode within the weld head should be inspected to ensure that it is correctly prepared, as well as clean and free of contaminants. The electrode type, diameter, and geometry should match the specifications on the WPS. The tungsten should be replaced after performing a test weld to free the weld head of accumulated moisture and before beginning a welding shift.
- Wire Feed: If a wire feed is present on the weld head it should be checked to ensure wire type and diameter matches the weld schedule specifications. Check the drive roll tension arm setting and wire guide tip for wear. The spool should also be checked to ensure that the quantity of wire available is enough to complete the weld, and that there are no impediments that might affect wire speed.
- Mechanicals: Perform a visual inspection of the weld head to ensure that all fasteners, mechanical interfaces, and armatures are still firmly in place and properly connected. Cables and hoses should also be checked to ensure that they will not interfere with the movement of the weld head, snag or trip the operator, or otherwise interfere with welding.
- Mounts: Finally, all guides and mounting brackets should be inspected to ensure they are firmly fastened to the workpiece. The weld head should be inspected to ensure that it is firmly connected to the mounts or directly to the workpiece as appropriate for the weld head type.
Power Supply Check:
- External Interfaces: Many orbital arc welding machines are designed to operate with external computers. Ensure that the computer is connected to the machine and that the connection is recognized by the appropriate programs.
- External Devices: If additional devices like heaters are present, check to ensure that they are connected to both the power supply and the power source.
- Welding Setup: Once all connections have been checked and the system is powered on, use the interface to load the appropriate weld schedule needed for the welding operation. Wire entry angle and position, and the positioning of the tungsten relative to the weld should be checked against the weld schedule to ensure they are correct. Torch lead, lag, and tilt angles should also be checked against the weld schedule. If the weld specifies oscillation of the electrode or wire, the settings should be confirmed as correct before starting.
A daily inspection for an orbital arc welding machine takes longer to read about than it does to perform, and is very similar to a traditional manual arc welding safety check. Welders who make a habit of running through a five-minute orbital arc welding machine daily inspection checklist will find that the process becomes second nature very quickly.
To help you make a habit of regularly assessing your workspace and equipment, we at Arc Machines have created a handy printable daily inspection checklist. No matter how much experience you have with orbital arc welding, following this checklist can help you make great welds and become comfortable with automated welding devices. It’s another way that Arc Machines is bringing consistent and reliable GTAW welding to more job sites and applications.
Click here to download our 5-minute daily inspection checklist
Arc Machines Inc. is a leader in orbital welding, with the people, products, and experience to make your welding project successful. For inquiries regarding products, contact sales@arcmachines.com. For service inquiries, contact service@arcmachines.com. Arc Machines welcomes the opportunity to discuss your specific needs. Contact us to arrange a meeting.